
Follow Us


Sharing


 Gardening with Uncle Mac
- Amanda Dcosta, views and reviews…
- My Writing Life with MJ Logan
- Julie Helms with peeps and sheep
- Camping out with Jim Bessey
Follow Us
Morgidoo’s Christmas Carol: The Bells of Blister

Morgidoo’s Christmas Carol: The Bells of Blister 3rd Edition Cover Artwork by Whitewood Forge Publishing All rights reserved. Available at Amazon and other fine bookstores in both eBook and Print
A Timeless Christmas Legend
*For readers of all ages.
“What if bells no longer rang?
In this unique tale, bells do not ring. They have been silent since the Great Silver Bell disappeared hundreds of years earlier -and snow, once as warm as popcorn, turned cold. Villagers may scoff at the old bell ringer and his stories, but Morgidoo Morgan believes the legend, and offers hope as he follows in the footsteps of his father to search for the Great Silver Bell. Will bells ever ring again? Enjoy this unique, timeless classic written to be enjoyed by readers of all ages.https://www.amazon.com/Morgidoos-Christmas-Carol-Bells-Blister/dp/1523683821
Sharing
- Glory Lennon on the gardening life
- Gardening with Uncle Mac
- Amanda Dcosta, views and reviews…
- My Writing Life with MJ Logan
- The exciting world of Momzinga with Kate Johns
- Julie Helms with peeps and sheep
- Camping out with Jim Bessey
Category Archives: How To…
Build with Rafter and Ridgeboard
© 2014 by Raymond Alexander Kukkee
[caption id="attachment_3081" align="aligncenter" width="640"] Chalet Style shed under construction with Rafter&Ridgeboard[/caption]
 Stick framing showing rafters and ridgeboard[/caption]
The rafter, after calculating carefully for length, is cut short at the peak to allow for half of the thickness of the chosen ridgeboard which may be a 1x6" or 2"x6 dimensioned lumber. The length of the rafter is calculated from the actual peak to the vertical cut for the bird's mouth notch which is made in the underside of the rafter at the top of the supporting wall.
An allowance for the overhang of the rafter is added to the rafter length calculation. The top end of the rafter is cut vertically to accept the fascia board. The fascia boards and ridge boards are both measured long enough to extend past the end walls, again to allow for overhang as desired and carry the ends of the ‘fly rafters’ on either end of the building . An overhanging ‘ladder’ assembly may be built to resting on the end wall, or simple ‘lookouts’ may be used to fasten the fly rafter .
*Hint: Cut one matching pair of rafters (opposing) and try them. If they fit perfectly, use them as patterns for the remaining rafters.
In typical stick-framing, (don’t you just love that old carpenter term?) 'horizontal ‘collar ties' would be nailed onto the opposing rafters close to the apex of the roof for added load-carrying strength. Additional collar ties to and from matching opposing rafters may also be added at the mid-point of the rafter. Doing so substantially improves the strength by creating what is in fact a simple truss. A diagonal support brace from the wall plate to the peak of the underside of the roof may be installed and fastened to each of the rafters to establish spacing and dimensional stability prior to roof sheeting. Following the installation of the rafters, ceiling joists may also be installed if desired.
[caption id="attachment_3082" align="aligncenter" width="640"]
Stick framing showing rafters and ridgeboard[/caption]
The rafter, after calculating carefully for length, is cut short at the peak to allow for half of the thickness of the chosen ridgeboard which may be a 1x6" or 2"x6 dimensioned lumber. The length of the rafter is calculated from the actual peak to the vertical cut for the bird's mouth notch which is made in the underside of the rafter at the top of the supporting wall.
An allowance for the overhang of the rafter is added to the rafter length calculation. The top end of the rafter is cut vertically to accept the fascia board. The fascia boards and ridge boards are both measured long enough to extend past the end walls, again to allow for overhang as desired and carry the ends of the ‘fly rafters’ on either end of the building . An overhanging ‘ladder’ assembly may be built to resting on the end wall, or simple ‘lookouts’ may be used to fasten the fly rafter .
*Hint: Cut one matching pair of rafters (opposing) and try them. If they fit perfectly, use them as patterns for the remaining rafters.
In typical stick-framing, (don’t you just love that old carpenter term?) 'horizontal ‘collar ties' would be nailed onto the opposing rafters close to the apex of the roof for added load-carrying strength. Additional collar ties to and from matching opposing rafters may also be added at the mid-point of the rafter. Doing so substantially improves the strength by creating what is in fact a simple truss. A diagonal support brace from the wall plate to the peak of the underside of the roof may be installed and fastened to each of the rafters to establish spacing and dimensional stability prior to roof sheeting. Following the installation of the rafters, ceiling joists may also be installed if desired.
[caption id="attachment_3082" align="aligncenter" width="640"]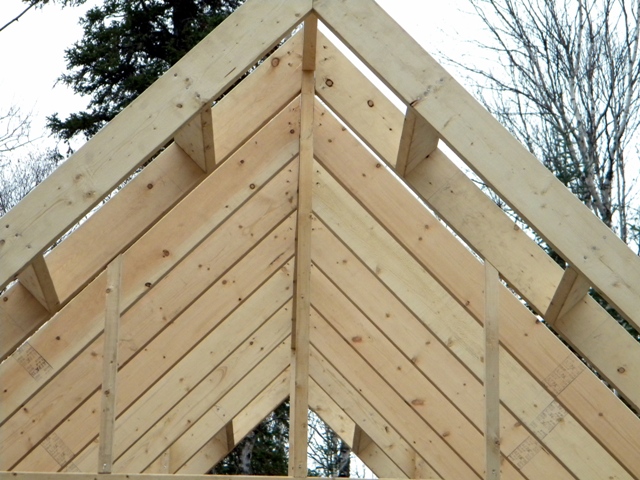 Symmetry of Rafters is Elegant Geometry[/caption]
See the photos! The beautiful symmetry of rafters carefully installed in stick-framing has a certain elegance...
Here's an over-simplified diagram.
[caption id="attachment_3085" align="aligncenter" width="881"]
Symmetry of Rafters is Elegant Geometry[/caption]
See the photos! The beautiful symmetry of rafters carefully installed in stick-framing has a certain elegance...
Here's an over-simplified diagram.
[caption id="attachment_3085" align="aligncenter" width="881"] Rafter and Ridgeboard Construction showing Collar tie[/caption]
Simple, isn’t it? Now you can build that dog house or play house with a storage space. Or a chicken-coop for the egg-laying chooks. Or a whimsical peaked roof for a wishing-well. Or a protective porch over that back door. The application is endless. After a small project is complete, try a larger garden shed too.
Apply the rafter and ridgeboard construction technique to your next building project and you’ll have discovered the joy of genuine stick-framing . Happy Building!
Is that Incoming I hear?
*Photo credits and diagram © 2013 rakukkee All rights reserved.
Rafter and Ridgeboard Construction showing Collar tie[/caption]
Simple, isn’t it? Now you can build that dog house or play house with a storage space. Or a chicken-coop for the egg-laying chooks. Or a whimsical peaked roof for a wishing-well. Or a protective porch over that back door. The application is endless. After a small project is complete, try a larger garden shed too.
Apply the rafter and ridgeboard construction technique to your next building project and you’ll have discovered the joy of genuine stick-framing . Happy Building!
Is that Incoming I hear?
*Photo credits and diagram © 2013 rakukkee All rights reserved.
Chalet Style shed under construction with Rafter&Ridgeboard[/caption]
Carpentry Retro: Build with Rafter and Ridgeboard!
Do you know what rafter&ridgeboard construction is? Most trained carpenters are familiar with rafter and ridgeboard construction because most homes in the past were built with this essential, reliable, strong construction technique. This timeless, and relatively simple construction method has fallen out of favour because of the convenience and availability of trusses.The Modern Truss: Alternative to Rafter and Ridgeboard Stick Framing
A discussion of rafter and ridgeboard stick frame construction would not be complete without an explanation why the use of trusses has become more popular. The modern home builder today is more likely to use pre-manufactured trusses which incorporate ceiling joists, rafters and engineered web designs into single units which are incredibly strong. Individual rafters, ceiling joists and other web components are all computer-designed and assembled with steel gussets into a ‘truss’ structure. The gussets are gang-nailed together, or today, more likely press-assembled with specially-designed steel gusset plates at the time of manufacture. An engineered truss offers rapid installation of the exterior roof framing and interior ceiling framing of a home simultaneously. With trusses, wide spans can be achieved without central load-bearing walls, posts or beams. Much time can be saved in construction by using trusses on large projects. Trusses for a small building such as a shed , play house, or doghouse are not necessary. Even for a modest full-sized home, rafter and ridgeboard construction is fast and efficient and can be achieved by competent carpenters and moderately-skilled DIYers. Your closest long- established neighbourhood in any city has many homes that demonstrate the method is reliable and strong enough to last for centuries. Building with Rafters and Ridgeboard Rafters are established in opposing matched pairs to form the roof, with each rafter leaning against, and fastened to a pre-installed ridgeboard at a calculated height with another rafter immediately opposite. The length of the rafter is calculated using the simple Pythagorean geometry of a right-angled triangle. The chalet style shed in our photo has a 12:12 pitch slope (45°) and a wide overhang. The pitch of the roof must be decided prior to making any rafter cuts. [caption id="attachment_3084" align="aligncenter" width="640"] Stick framing showing rafters and ridgeboard[/caption]
The rafter, after calculating carefully for length, is cut short at the peak to allow for half of the thickness of the chosen ridgeboard which may be a 1x6" or 2"x6 dimensioned lumber. The length of the rafter is calculated from the actual peak to the vertical cut for the bird's mouth notch which is made in the underside of the rafter at the top of the supporting wall.
An allowance for the overhang of the rafter is added to the rafter length calculation. The top end of the rafter is cut vertically to accept the fascia board. The fascia boards and ridge boards are both measured long enough to extend past the end walls, again to allow for overhang as desired and carry the ends of the ‘fly rafters’ on either end of the building . An overhanging ‘ladder’ assembly may be built to resting on the end wall, or simple ‘lookouts’ may be used to fasten the fly rafter .
*Hint: Cut one matching pair of rafters (opposing) and try them. If they fit perfectly, use them as patterns for the remaining rafters.
In typical stick-framing, (don’t you just love that old carpenter term?) 'horizontal ‘collar ties' would be nailed onto the opposing rafters close to the apex of the roof for added load-carrying strength. Additional collar ties to and from matching opposing rafters may also be added at the mid-point of the rafter. Doing so substantially improves the strength by creating what is in fact a simple truss. A diagonal support brace from the wall plate to the peak of the underside of the roof may be installed and fastened to each of the rafters to establish spacing and dimensional stability prior to roof sheeting. Following the installation of the rafters, ceiling joists may also be installed if desired.
[caption id="attachment_3082" align="aligncenter" width="640"] Symmetry of Rafters is Elegant Geometry[/caption]
See the photos! The beautiful symmetry of rafters carefully installed in stick-framing has a certain elegance...
Here's an over-simplified diagram.
[caption id="attachment_3085" align="aligncenter" width="881"] Rafter and Ridgeboard Construction showing Collar tie[/caption]
Simple, isn’t it? Now you can build that dog house or play house with a storage space. Or a chicken-coop for the egg-laying chooks. Or a whimsical peaked roof for a wishing-well. Or a protective porch over that back door. The application is endless. After a small project is complete, try a larger garden shed too.
Apply the rafter and ridgeboard construction technique to your next building project and you’ll have discovered the joy of genuine stick-framing . Happy Building!
Is that Incoming I hear?
*Photo credits and diagram © 2013 rakukkee All rights reserved.

Wow! The World is Turning Faster!
Wow! The World is Turning Faster!
by Raymond A. Kukkee ©2025 [caption id="attachment_3362" align="aligncenter" width="640"]Wow! The world is turning faster.
The world is turning faster? Is it? For a whole year? And...do we know why? How can we tell? Old-timers say "Just look up at the stars and hang onto the grass. Let'er spin. If you have grass, that is." Really. Maybe its safer to ride a bicycle on a moonbeam up in space too? Albert Einstein knows, but we do not. But— never give up. Keep on breathing. There 'ya go! That secret is supposed to work, even in March. And here's a helpful tip: Shovel first, breathe, shovel second, breathe, and repeat. Enjoy yourself and the inevitable ride on a green carpet or a lawnmower comes with sun-in-your face May flowers. Always watch for satellites, red moons, falling stars, interesting ideas, and new motivation. Wow, the world IS spinning faster, maybe we do know why. Get the idea? Getting older seems to spin the world faster. But only when you're doing busy things. Old guy advice. See? Old guys know stuff.A Catch-up or Two
Apparently we finally caught ourselves dithering with time flying by for various reasons. There has been a lot of questionable political stuff happening; Canadian, American, globally. That's a very large collections of incomingbytes© passing us by on the breeze every day since we last posted. Winter. Work, projects, delays, distractions, world events. Med challenges. Maybe a bit of resting up was essential. A birthday or two. Endless war in Europe, political and ideological unrest, demonstrations prove daily that if it can happen again, it does. Murphy's law. If it can happen there it can happen anywhere. Wow! the world is turning faster. Go figure. So in the interim— trying to decide to carry on blogging, a plethora of wise unknown tech entities decided to start using iterations of incomingbytes© as extra-valuable search words for Google search entries etc. Not funny— but not surprising either.Then came the bug.Digital is bendy and trendy.
To explain, that was more than annoying disconcerting because my blogs, the domain incomingbytes.com© and incomingbytes.blogspot.com, it's ancestor, have been in use around and registered for about 14+ years. It was a mystery, now resolved. One or more of those search articles in Google® and Safari® seemed to make it impossible to bring up this site, —my very own web site. On my own computer, yet. Most annoying to say the least. Other computers and the iPhone discovered them just fine. Go figure. Digital is trendy and bendy. Entrepreneurs use it for whatever. No matter.Welcome Back, Dear Readers!
I finally got the issues resolved with a lot of experimentation, AI, and exasperation. Trying to find answers in a tiny 8GB Ram computer, challenging even with experimentation and coffee. Eventually to my delight, a couple of days later, incomingbytes.com© appeared on the screen with some significant suggestions from Web Hosting Canada with tweaks and tries. and many failures. Much appreciated, WHC, a couple of helpful reminders by tech service. Win 10 files still exist. So the bottom line seems to be: it does not help to have 10 years of inhospitable host entries, exchanged of old backup files, host files, cache files, the guts of 'whatever' cookies files stuck to tires, —and the burden of shared data, long-ignored DNS flushes on three active interactive data-exchanging browsers, which immediately replaced themselves with backup files when deleted—were all certainly capable of holding up serious hosting.Learn, but Don't Forget Is the Key.
I had to re-learn how to navigate the tricky tech guts of a real Win10 operating system again, complete with hosting files, dns flushes, cache flushes, network mapping, admin authorization, the stuff I once did use daily in days of yore, but happily forgot whilst writing, chasing words and diddling with two relatively modern computers...and here's why; modern operating systems makes stuff easy to use, but hard to find, chase down and fix. If you don't know where to look, or how to alter them. Especially problematic vulnerabilities. I Got IT. That's why the world is turning faster. Great tip: Learn and don't forget technical skills just because new systems are so convenient. I better get Win 11 pretty soon. I hear it's easier, better, faster....uh, huh. See? So the 6-million dollar blogger trundles on, waiting for the snow to melt, the world spinning faster or not. Time does that. See what happens?**
Is that incoming I hear?
Please Drop a comment. Are your clocks running faster too?