


© 2008 by Raymond Alexander Kukkee
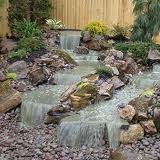
"A pondless waterfall has a water reservoir or catch basin built into the ground. It collects the water as it splashes and falls on to the rocks. The water disappears gently into the gravel and stones. Magic? No, but it looks that way."
 There is something peaceful and natural
 about the sight and sound of falling water that appeals to human beings. From the mighty roar of Niagara Falls to babbling, tiny splashes of water in brilliant sunshine observed in the tiniest waterways, waterfalls have always attracted attention, induced serenity and created a sense of peaceful wonder.
Have you dreamed of building a waterfall,
but, alas, have no pond?
Surprise!
You can build a waterfall without a pond. As a relatively low-maintenance feature, pondless systems have become one of the hottest new trends in landscaping.
Why build a 'Pondless' Waterfall?
There are several benefits to building the " pondless" way, including the most important issue of
safety for curious children. Other benefits are :
- Pondless waterfalls reduce liability. Safety
- No pond of standing water exists to fall into, therefore one of the major drawbacks to having an open pond is eliminated.
- In hot weather there is no green algae or pond scum to bother with.
- The water is aerated in falling, so it remains fresher and smells better.
- There is no standing water to invite mosquitoes to your back yard
- although some water-loving plants are often placed in the gravel for visual effect, there are no fish or other forms of pond wildlife to worry about.
- The system can be conveniently shut down for vacation, or drained for the winter with ease.
How does it work?
A pondless waterfall has a water reservoir or catch basin built into the ground. It collects the water as it splashes and falls on to the rocks. The water disappears gently into the gravel and stones.
Magic? No, but it looks that way.
The water disappears completely into the gravel, and collects in a liner that ultimately functions as a reservoir, or it directs the water to a reservoir. The
reservoir, pump chamber, or "vault" is a rigid polyethylene container that houses a submersible pump, and
the container is completely out of sight under the decorative structure of rocks.
The water is retained in the system by the use of the
unseen water-proof membrane or liner wherever it flows, and the pump vault can be set up to have water added automatically with a valve to compensate for evaporation. Provision may also be made for
filtering the water.
A pondless waterfall can be designed as a large system circulating many gallons of water each hour, and it can be incorporated as the main landscape feature with large rocks, giving it the attractive appearance of a natural dry stream bed when the water is shut off.
Here is how to build a waterfall without a stream, without a pond, and without using up all of your landscaping budget.
You may require a building permit, so check that out prior to beginning any construction.
Tools and Supplies Required:
- Shovel and pick ( or mini-excavator or backhoe service for a larger installation )
- Tape measure
- Plumbing supplies including pump vault kit (reservoir well, vault, or sump)
- The pump vault kit (it may also be called a reservoir, well, or sump *Note: The pump vault kit (it may also be called a reservoir, well, or sump ) includes an appropriately sized pump, a flex delivery hose, and other assorted parts
- a liner and protective underlayment for the liner to place in the water storage area
- a strip of liner to be installed where the water is to flow in the stream bed
- Decorative rock and cobbles of your choice are required for aesthetic appeal. Use large accent rocks where possible.
Note: Some manufacturers offer standardized , complete kits that are appropriately sized, but
here are the steps to follow to build your own system.
1. Decide what overall size the attraction will be. Will your attraction be
a mini-river perhaps 4' -6' long terminating in a waterfall, or will the stream be longer, perhaps 16 or 20 feet in overall length including
several mini-waterfalls? Consider the depth of water may be 2" to 4" deep in the stream.
Verify the GPH (gallons per hour) rating of the pump you have chosen.
2. Decide where the best visual advantage of the waterfall attraction may be obtained. Do consider the orientation and point of view from both inside and outside the home if possible to optimize the opportunity to create a
visual focal point in your landscaping.
3. Calculate the total volume of water that will be in the system.
Include the volume of the pump vault, reservoir and the depth of water in the stream. Consider cubic footage total.
*
Note that most of the lined reservoir (80%) will be filled with rocks, cobbles or coarse gravel, so it must be sized adequately. The amount of water displaced by the rocks depends to a great degree on the size of rock chosen.
* Note: The draw down, or the difference between the water level in the reservoir when the pump is shut off, compared to when the pump is running, will equal the amount of water IN the stream, and is critical. The static level of the water remaining in the vault must remain high enough to cover the pump at all times. The system should contain enough water to operate the pump properly and display maximum water along all of the features, but it may also be shut OFF at times, therefore the lined basin filled with rocks must be adequately sized to hold all of the water below the rock surface when the system is shut down.
4. Excavate the area as required and
install underlayment and the pond liner (
usually 45 mil EPDM , or
"ethylene propylene diene monomer" which is a tough rubber-like product )
The liner is measured and cut to size specifically for your project.
5. Note: * DO remember to install adequate underlayment to protect the liner from being perforated .
Once covered with rock and gravel, it is difficult to replace !
6. Remember to allow for safe routing of the pump cable and set up the reservoir well (or snorkel system if required) for the pump reservoir
as specified by the manufacturer.
7. Attach the delivery flex pipe and filter unit if applicable. Locate the filter housing
where it may be easily serviced and easily camouflaged in the landscape as required.
8. Install the flex pipe to the head of the flow (the weir, or
highest point on the stream) and
install a strip of liner along the full length of the stream to the point of drop, where the water will flow over a flat rock, falling into the reservoir by
disappearing into the gravel.
Do create smaller waterfalls along the stream if desired, and using rocks and select grade,
install sub-surface rocks as "choke points" for rapids as desired for maximum natural aesthetic appeal for the action of the flowing water.
9. Fill the stream and reservoir carefully with layers of cobbles and stone, placing no sharp rocks directly on the liner.
10. Hook up the water supply and check the auto-fill valve for
correct operation . Fill the system with water, and prior to covering up the access to the pump,
verify there is an adequate level of water depth over the pump.
11. Test the pump for correct operation, observing tha
t the level of water over the pump is adequate while it is in operation. If satisfactory,
cover the vault with rocks as desired.
12. Add and adjust large rocks, cobbles, accent rocks or gravel for maximum aesthetic appeal.
Water should not be visible on the gravel or rock surface, it should disappear completely.
13. Plant some water-loving, or marginal water plants in the gravel around the waterfall area for accent if desired.
14. Install accent lighting. The new solar-powered individual lights are easily located for maximum visual effect. Consider placing one
behind the waterfall for spectacular night time appeal.
Turn the system on and admire it. Make minor adjustments to the aesthetic values, rocks, and accessories. Adjust the lights. Have a barbecue. Admire your creative work. Congratulations! You now have a waterfall in your yard built the
pondless way!
##
Is that Incoming I hear?
Photo: Courtesy of
PurelyPonds.com


While noting that most of my inner circle could only be classified as “Pond Scum” I have to admit that they can be annoying. Ray this is a great idea, clearly described and a terrific alternative to a pond. Thanks for writing it.
Haha, Mac, this cool little project does eliminate pond scum and associated indigenous species…too funny. I really like this idea too, thanks bud, I agree, it certainly has it’s merits.
About two weeks ago,I had a double pondless spillway installed.I also had a turn off switch to turn the system off as needed especially when I am away.About a few days ago when I had to be out of town,I turned it off.Upon my return, the two ponds were 3/4 filled with standing water.Yes I called the contractor who will be back from vacation on Monday August 26th.
This is certainly NOT A PONDLESS OPERATION AND I AM DISAPPOINTED Could this be remedied? Is it fixable? I was told that I have to go out everytime and manually turn off the water.What should I expect for corrective measures?Is there some system which could handle both?i.e stop the flow of the spillways AND remove the visible standing water?
Please advise
Hi Josine,
Your installer must look at the system and optimize the water levels. Other than the total water capacity it should hold, it sounds like the controls and float level control system could be set up incorrectly, or another possibility is that….the wrong size of reservoir was installed. The most simple problem may be that the system has been badly overfilled. There should be no visible standing water in the system when it’s active. There should be NO standing water, ever…..and . It certainly should not build up water when it is shut off.
When the system is shut off, if the reservoir has been sized correctly, and it has the right amount of water in the system the reservoir should be full with no standing water visible in the ‘pond’.
If you have only a manual filling system, ensure the contractor checks to make sure it is shutting off properly when you shut it off. The pump reservoir may have been overfilled,–or have you had heavy rain? Automated control systems should keep standing water out of sight when the spillway is running.
Has he installed an automated filling system that is malfunctioning and failing to shut down? Clearly the system has to be optimized and yes, it is fixable.
When the spillway pump is shut off, the reservoir should be full, and there should be NO water visible. The reservoir should NOT be full when the system is running with water in the spillway(s), but must have adequate water levels to supply the pump. Best luck with that, hopefully your dealer knows what he’s doing.